HVX 200 Camera Formats
To find out which is the best scene file format to use click here for the European Broadcast Union’s opinion or click here for an explanation why 1080i is not as good as 720p
Using images in a HD timeline
Open images in Photoshop
Save the image at 96 dpi and about 2000 accross
a directional blur of 1 or 2 pixcels straight up and down @ 90 degrees
PROTOCOLFCP files all go into one file on one disk but FCP project copy goes somewhere separate.
Back up project frodo folder onto backup disk
 export a quicktime large file for DVD and a
flash file for web
managed filesNaming convention:Media Factory/ProjectsArchive Media onto DVD using File Manager in FCP, put all data onto DVDs.Keep one DVD of movie for us.
Settings for Exporting to Web
For exporting to 16×9 use 320 x 180


FCP Low Res Settings
Settings For Exporting to DVD


Encoding for Flash
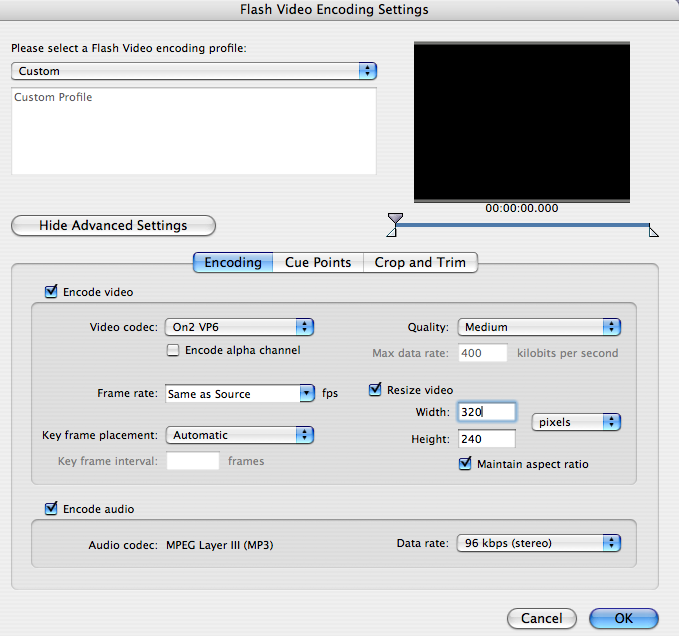
the average data rate for a piece should be around 360. 700 for an absolute best presentation.
Frame rate for something with lots of movement at 25 fps. Sit-down interviews 16 fps.
Resize the video to your desired size. Click maintain aspect ratio.
Take the four files
the .swf
the .html
the skin
and the flv files and post them on the server.
 (don’t forget the .swf skin file which is named after the skin file type)
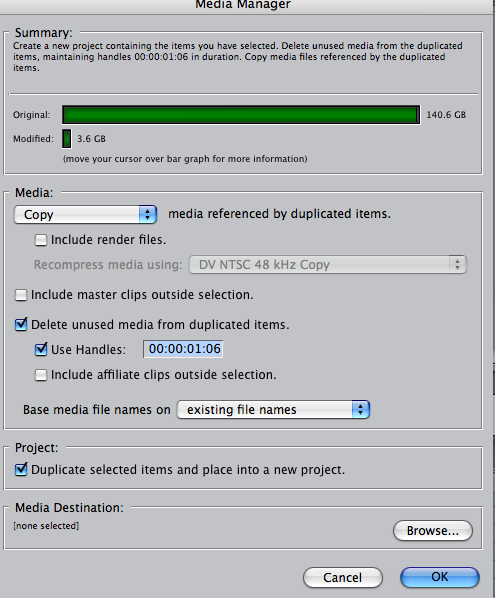
Exporting Files For Storage
File: Media Manger
Thrashing Preferences in Final Cut Pro
http://www.lafcpug.org/trashing_fcp_prefs.html
TRASHING Preferences in 5.1
Quit FCP.
Open your Hard Drive.
Set to Column View.
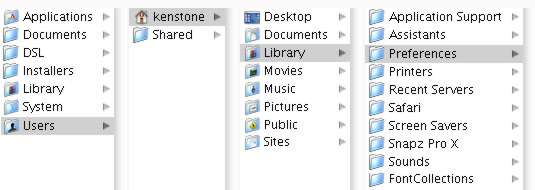
Follow the path: Users > Name > Library > Preferences.
In the Preferences Pane look for “com.apple.FinalCutPro.plist”, shown below in Yellow. Drag the FCP plist to the Trash.
In the same Preference Pane, look for the Final Cut Pro User Data Folder.
From inside the Data Folder, drag ‘Final Cut Pro 5 Prefs’, ‘Final Cut Pro Obj Cache’ and ‘Final Cut Pro Prof Cache’, all three shown below in green, to the Trash.
Do NOT empty the Trash.
Launch FCP and check all your settings. All FCP setting will have reverted to default. Don’t forget to reset your Scratch Disk settings.
Once FCP is up and running, empty the Trash.
FCP 5
Trashing Preferences IN 3 AND 4.5
1. Quite FCP.
2. Open your Hard Drive.
3. Set to Column View.
4. Follow the path: Users > Name > Library > Preferences.
5. In the Preferences Pane look for “com.apple.FinalCutPro.plist”, shown below in Yellow. Drag the FCP plist to the Trash.
6. In the same Preference Pane, look for the Final cut Pro User Data Folder.
7. For FCP 3, drag both “Final Cut Pro 3 Preferences” and “Final Cut Pro MOA Cache”, shown below in Green, to the Trash.
8. For FCP 4, drag both “Final Cut Pro 4 Preferences” and “Final Cut Pro POA Cache”, shown below in Red, to the Trash.
9. Do NOT empty the Trash.
10. Launch FCP and check all your settings. All FCP setting will have reverted to default. Don’t forget to reset your Scratch Disk settings.
11. Once FCP is up and running, empty the Trash.
creating flash movies on the site:
Take the high resolution, uncompressed quicktime from FCP and go through the Flash 8 encoder steps to create a flash video file, aka “.flv” file.
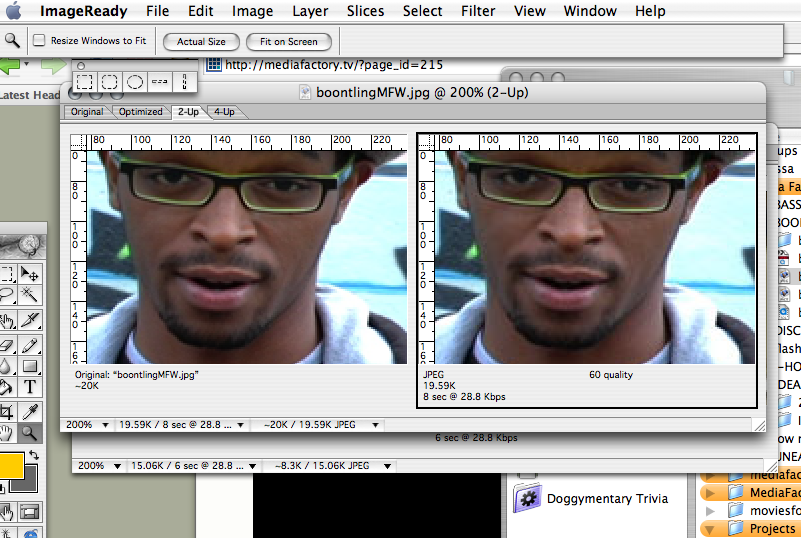
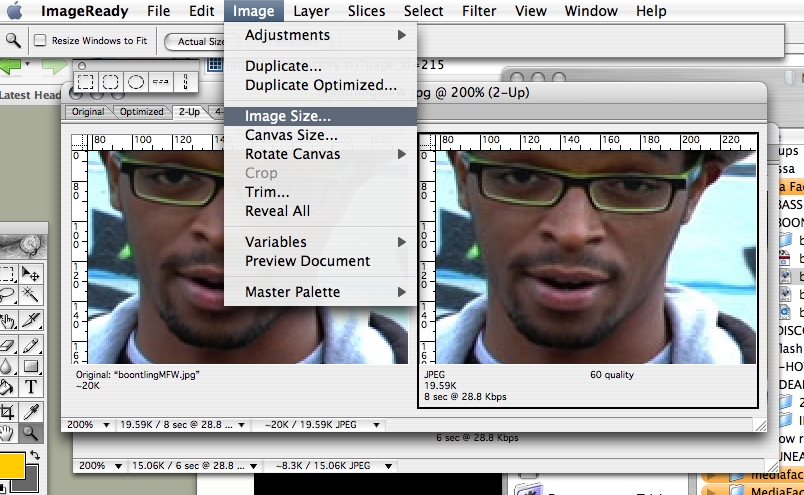
you need to upload onto the mediafactory server two files in order for a flash movie to work. The .flv file, the .jpg file that has the SAME name as the .flv file. The jpeg must be the same size as the movie, so resize it in Adobe Image Ready.
To resize the photo in Adobe Image Ready:
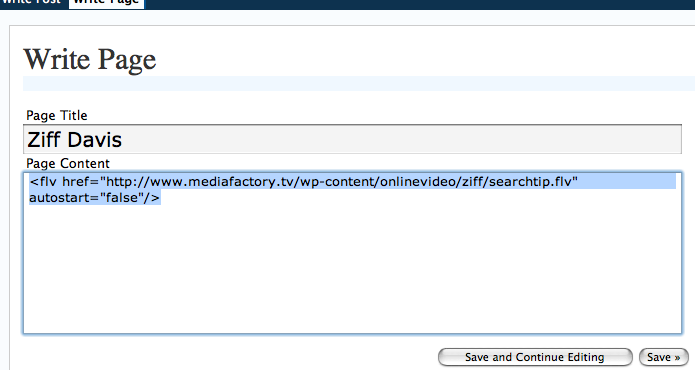
Code to post a new flash file:
HOW TO MAKE A QUICKTIME WINDOWDUB!
For transcriptions and other handy purposes
1.) Ensure that DVCam deck is plugged into Final Cut System, and that there are
at least 20 gigs of space available on the capture hard drive
2.) Open the Final Cut Pro program
3.) CAREFULLY insert the DVCam tape you would like to window dub into the deck
4.) Go to File > Log and Capture
5.) A new “Log and Capture†window will come up. Use the remote controls in the window to rewind the tape, if it is not already rewound.
Note: It’s best to avoid leaving the tape in the middle. Always rewind the tape after use to
minimize the possibility of damaging footage
6.) You should see bars & tone at start of tape. Let play for 10-15 seconds, then click “Capture†Button at the bottom right hand corner of “Log and Capture†window
7.) The Log and Capture window should say “Now Capturing†and show a slightly artifacted live capture of the footage
8.) Go have a cup of coffee and enjoy other rewarding work-related tasks. Return after about an hour, as it will stop capturing on its own if it hits the end of the footage. Or, you may have to press “Escâ€, as prompted.
9.) You will see this window: “ Final Cut cannot autosave your project unless you save it first. Would you like to save it now? Answer no, unless you want to keep the capture for some reason other than Quicktime Window dubs. I, Kat, always answer “Noâ€.
10.) Double click on your “Untitled 1†project in the browser window. This should pull it up into the player.
11.) Press play to ensure audio and video capture. Is it all there? If so proceed to:
Effects < Video Filters < Video < Timecode Reader (not Generator!)
You should now see Time Code on the viewer window
12.) Now, Go to File < Export < Using Quicktime Compression
13.) Save as: Last name of the interviewee_pt1 (or 2 or 3, depending on how many interview tapes feature that one person)
Example: Morris_pt3
14.) Now, go to the bottom left hand menu to FORMAT. Pull down menu to change from Quicktime Movie to MPEG-4. Then Save to the desktop folder “BTW Transcriber Quicktimesâ€.
15.) 40 minutes of tape will probably take 1 hour to export. In the meantime, manually rewind the tape and remove it from the player.
16.) When it’s done exporting, it’s a good idea to save your Quicktime file to a thumb drive and transport it to Avon and Kat’s computers for backup. You could also make a CD or DVD, if they are being transported to transcribers.
16.) When you’re all finished, close Final Cut Pro. They’ll ask if you want to save Untitled Project 1- say No. Look in folder and open Quicktime file to ensure it’s there. Click and play to assure you’ve got it with Time Code. Is it there? Congrats! You now know how to make a time-and-money-saving Quicktime Timecoded window dub.
11/6/06
Panasonic P2 Camera
P2 Software